


Note:
We have compiled the most effective methods to simplify installing and configuring your GA4 with Google tag manager. If you are looking to set up using Gtag or GTM, but facing some blockers, feel free to reach out to us we shall help you set it up flawlessly.
A person could be forgiven for assuming that, with a name like “Universal Analytics,” UA would have been as all-encompassing as it got.
After all, the term “universal” is a broad concept in and of itself.
Google has again surpassed itself with the release of Google Analytics 4 (GA4).
On multiple occasions, Google has emphasized that this will take time. Instead, the change will occur gradually.
This methodical strategy allows businesses to use Universal Analytics (UA) and Google Analytics 4 (GA4) simultaneously.
By maintaining both analytics properties in parallel, you can begin archiving data before Google finally disables UA.
As we see, “Universal Analytics will no longer process new data in standard properties beginning July 1, 2023. Prepare now by setting up and switching over to a Google Analytics 4 property.”
You may find yourself initially asking, “How do I even set up GA4? Where do I begin with the setup? How do I coordinate its operation with UA?”
Your voices have been heard.
As a result, we’ve got you in our sights. We will walk you through each step below.
How to set up GA4 for your website?
The procedure for installing Google Analytics 4 with Google Tag Manager is as follows:
- Develop a fresh GA4 property
- Create a data stream
- Copy the Quantity ID
- Create a Google Analytics 4 Tag for Configuration
- Paste the Measurement ID and activate the tag on All Pages.
- Test/preview the new tag
- Publish the modifications to Google Tag Manager
#1. If you are using an older version of Google Analytics
What if your website already uses Universal Analytics (the previous GA version)?
If the earlier version is still functional, you may continue to use it (for now).
However, it would be best to adopt GA4 as quickly as possible, within reason. Both versions can coexist simultaneously on a webpage.
Let’s discover how to set up Google Analytics 4 together.
#2. Create an Analytics 4 property and data stream.
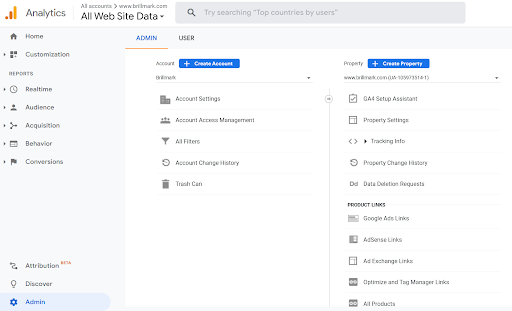
- Navigate to the Admin area of your Google Analytics interface by clicking Admin in the bottom-left corner
- Then select Create Property in the Property section.
- Input the Property’s name. It could be the name of your website, business, brand, etc.
- Next, select the country, reporting time zone, and your business’s primary currency.
- Then, click Next, respond to the subsequent questions, and click Create to finish creating your New Property.
- The following step is to configure your initial data stream.
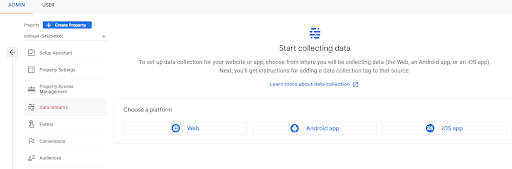
Here we will concentrate on a Web stream. You can choose as per your requirements.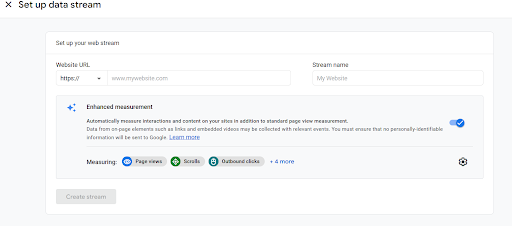
- Enter your website’s URL. For instance, https://www.brillmark.com.
- When prepared, click the Create stream button.
Note:
In Google Analytics 4, you can enable or disable Enhanced Measurement when establishing a web data stream.
This assists marketers in including as many events as possible in their reports without needing to collaborate with developers or configure them in Google Tag Manager.
This functionality is enabled by default and will automatically record the following events:
- Page view
- Scroll
- External link click
- Site-wide search
- Video Engagement
- Downloading a File
- Form submissions
You can individually disable or enable events if you so choose. To accomplish this, click the gear icon in the Enhanced Measurement section and then the toggle buttons.
#3. Install Google Analytics 4 utilizing Google Tag Manager
- A measurement ID will be displayed when you generate a data stream (web). Copy it.
- Measurement ID can be used in Google Tag Manager.
Note:
Moreover, if you ever get lost in the GA4 interface and need to return to this page, navigate to Admin > Data Streams >, select your most recently generated stream, and you will be returned to the window.
- Then navigate to your Google Tag Manager container > Tags > New and select GA4 configuration.
- Enter the ID you copied from the GA4 interface into the Measurement ID field.
- Keep the Send a page view event when this configuration loaded option is enabled to track pageviews automatically.
Note:
In most cases, leaving the pageview checkbox enabled is acceptable. However, in certain circumstances, such as single-page applications, it is advisable to disable the pageview checkbox and create an independent configuration tag.
- Select All Pages in the Triggering section and then name the tag.
#4. DebugView in Google Analytics version 4
Note:
Please commit this section to memory. As confirming that your data was delivered to Google Analytics 4 correctly is vital. DebugView is the prominent feature developed for debugging GA4 data.
- Enable the GTM Preview Mode to evaluate your modifications.
(You can do that by clicking a big PREVIEW button in the top-right corner of the GTM interface.)
- Once enabled, observe the new GA4 tag among the fired tags.
- After configuring your events, you must now test them.
- Go to Configure > DebugView on the left side of the GA4 interface to locate it. Click it.
Note:
Most likely, there will be no data there (yet). This is because this data in the DebugView is ONLY available when debug mode is enabled in GA4.
To enable debug mode in GA4, you have multiple choices:
- Enable the GA debugger Chrome extension
- OR send the debug mode option along with an event
- OR enable Google Tag Manager’s Preview mode on the debugging page.
Install the extension here in the case of the first option, and then click its icon (so that you can see the ON ribbon).
From this point forward, your events will begin to appear in DebugView.
Please note that we have observed a delay between when an event occurs on a website and when it appears in DebugView.
Occasionally, there is a several-minute wait for the data to arrive.
This is a bit disappointing, but the Google Analytics 4 development team will address this in the future.
Sometimes refreshing the DebugView page is also helpful.
Ensure that the relevant Debug device is selected in the upper–left corner.
#5. Publish your modifications in Google Tag Manager.
Once you’ve confirmed that the data is successfully ingested and shown:
- Submit your GA4 modifications in the GTM container and publish it.
You can accomplish this by clicking the SUBMIT button in the upper–right corner and then following the instructions provided by the user interface.
You should quickly observe the new data in your real-time reports.
#6. Google Analytics 4 reports in real-time
- Go to Reports > Realtime in the Google Analytics 4 interface’s sidebar on the left.
- You will first be presented with a map and a collection of cards containing traffic sources, the most popular events, and the number of users in the 30 minutes.
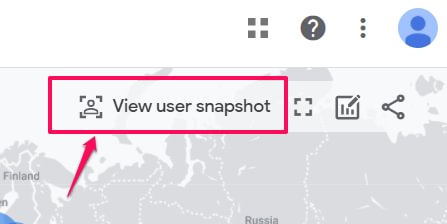
- You can also examine the snapshot of a particular user. Click the View user snapshot button in the upper-right corner to accomplish this.
- After clicking the View user Snapshot button, you will get a stream of all events for that specific user, and you may click on them (just as in the DebugView) to see details.
- If you prefer to view another user or visitor, click the arrow button.
- Press the Exit snapshot button in the upper-right corner to exit the snapshot.
Conclusion
Get GA4 Tracking in Place Today for Better Information Tomorrow.
We advise you to activate your Google Analytics 4 account well before the deadline of July 1, 2023.
More data will be available when Universal Analytics is discontinued the sooner you switch to GA4 and begin tracking your website’s statistics.
Since Google Analytics 4 is different than Universal Analytics, getting started on the configuration now will offer your team more time to make mistakes, learn the new platform, and run parallel tracks to ensure the data is accurate.
Although the GA4 Setup Assistant is an excellent place to begin, it will not be able to provide you with the specific, individualized guidance that your eCommerce company requires.
We recommend working with an expert like Brillmark, as they provide Google Analytics setup & GTM setup for Shopify, WordPress, and all other platforms.
They can tailor the transfer process to your needs and check your tracking extensively before the deadline next summer.
Reach out to us for more information.